
How to Use a Snap Button Kit

A snap closure can make a handmade pouch, shirt, or baby bib easier to open and fasten. A Snap Button Kit usually includes button components, a setting tool, and instructions, though the exact parts vary by brand. Knowing what each piece does helps prevent mismatched halves or damaged fabric. Check the kit’s guide before starting. Small parts matter.

The fabric itself matters, too. Lightweight cotton may need a small reinforcing patch, while thick denim can require a tool designed for heavier layers. Test one snap on a fabric scrap before working on your finished project. Feel how the prongs pass through the material, and check that both sides meet evenly. A snap that looks straight may still feel stiff.

This guide explains how to identify the components, mark placement, make a neat hole, and set each snap with controlled pressure. It also covers common problems, such as loose fasteners, crushed caps, and fabric that puckers around the button. Keep your fingers clear of the setting tool, and work on a firm, stable surface. Follow the manufacturer’s directions if they differ from general advice. The first attempt may not be perfect; that is why a test piece is useful.
How to Use a Snap Button Kit

Identify the Parts of a Snap Button Kit

How to Use a Snap Button Kit

Identify the Parts of a Snap Button Kit

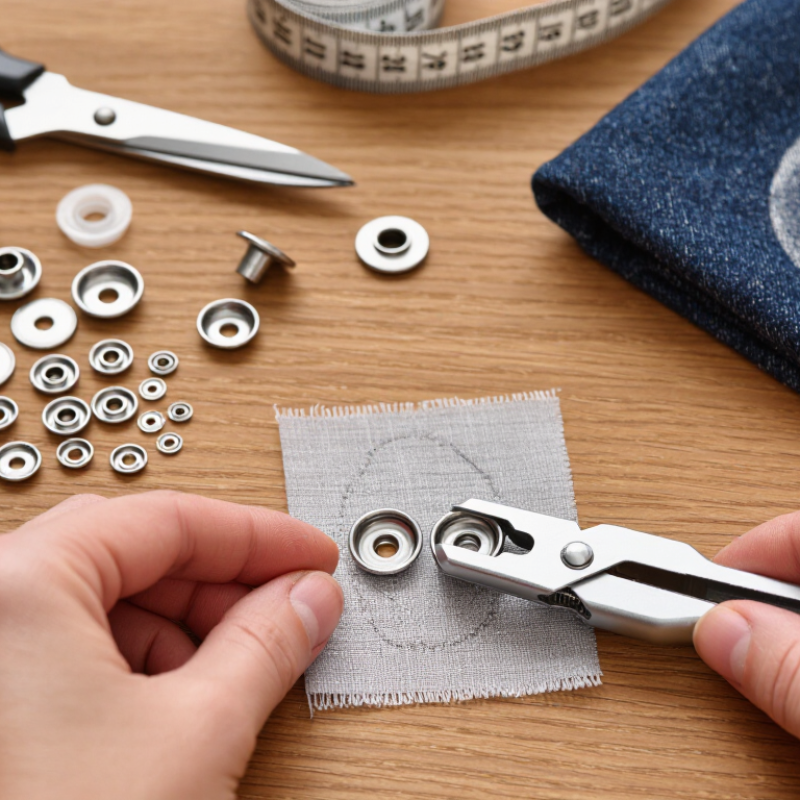
A snap button kit usually contains four fastening pieces: a cap, socket, stud, and post. The cap creates the smooth, visible top. Its post passes through the fabric and connects to the socket. On the other side, the stud connects to its matching cap and presses into the socket. That matters.

You may also find a setting tool, a small anvil, and a hole punch. The anvil supports the snap while you work; the setter helps flatten or curl the metal parts together. Some kits use differently shaped tools, so compare each piece with the included instructions. Labels can vary, and guessing by appearance alone is a little risky.

Before setting anything, arrange the parts in pairs on a table. Match the cap and socket for one side, then the post and stud for the other. Check that the stud clicks into the socket before attaching them to fabric. A scrap of similar-weight cloth makes a useful test. Thin material may need reinforcement, while thick layers can prevent a clean closure. It is easy to overlook that detail.

How to Use a Snap Button Kit: Identify the Parts

A complete snap fastener has four parts: a cap, socket, stud, and post. A common hand-setting setup also uses a setter and anvil. Kit contents and tool designs vary, so check your kit’s instructions.

Choose the Snap Placement and Mark the Fabric

Before using a snap button kit, decide exactly where the closure should sit. Lay the fabric flat and align its edges as they will appear when worn. Check that the overlap is wide enough to cover the snap without pulling. A ruler helps keep several snaps evenly spaced. Small differences show.

Mark the center of each snap position with a washable fabric pen or tailor’s chalk. Measure from a consistent edge, such as the finished hem, rather than estimating by eye. If the fabric has a print, check that the placement looks balanced against its pattern. Keep marks away from thick seams, where setting the snap can be awkward. For stretchy or lightweight fabric, consider a small reinforcement patch on the wrong side.

Before making holes, close the fabric and compare the marks on both layers. They should meet cleanly, but mark each layer separately if the cloth shifts easily. Test the placement on a fabric scrap first, especially if this is your first snap. It is easy to rush this part. I have found that a snap placed slightly off-center can make an otherwise neat edge look crooked, so I pause and check the alignment once more.

Prepare the Fabric and Align the Snap Components

Before setting a snap, check the fabric’s thickness, weave, and stretch. Textile Exchange’s Materials Market Report 2024 estimates global fiber production reached 124 million tonnes in 2023, reflecting how varied textile materials can be. A snap that holds firmly in woven cotton may distort lightweight jersey. Wash and dry the fabric as you plan to care for the finished item, then press it flat. For repeatable measurements, ISO 139 specifies a standard textile-testing atmosphere of 20°C and 65% relative humidity, with tolerances. Home sewing conditions differ, but stable fabric makes marking easier.

Mark the snap center with a removable fabric pencil, then measure again from the edge and nearby seams. Small shifts show. Place the fabric on a firm, protected surface and align the cap, socket, stud, and post according to the kit’s instructions. Keep every part facing the correct way; a reversed socket can prevent closure. On thin or loosely woven cloth, add a small piece of matching interfacing behind the snap. Test the full sequence on a scrap first. I sometimes rush this check, and the finished placement can look slightly crooked. A few seconds with a ruler is worth it.

How to Use a Snap Button Kit - Prepare the Fabric and Align the Snap Components

Step Task What to Do Alignment or Quality Check Common Issue to Avoid
1 Check the kit Lay out the snap parts and tools on a flat surface. A typical snap set has four pieces: a cap, socket, stud, and post. Confirm that the parts fit the setting tool supplied with the kit. Mixing up the socket and stud, which form the two sides that fasten together.
2 Prepare the fabric Wash and dry washable fabric before marking if shrinkage could affect placement. Press the area flat and remove folds or wrinkles. The fabric lies smooth, with no thick seam or bulky fold beneath the snap location. Setting a snap on wrinkled fabric, which can leave the finished fastener crooked.
3 Reinforce if needed For lightweight or loosely woven fabric, add a small piece of interfacing or a fabric reinforcement patch on the wrong side. The marked area feels stable and does not stretch easily when gently pulled. Using a snap on unsupported fabric that may tear or distort with repeated use.
4 Mark the placement Choose the fastening point and mark the center with a fabric-safe pen, tailor’s chalk, or a removable marking tool. Measure from the fabric edges or garment reference points so corresponding snaps sit at matching positions. Marking too close to an edge, where the fabric may split or the snap may pull out.
5 Make a pilot hole If the kit instructions call for it, pierce the marked point with an awl or the recommended hole punch. Make a hole only large enough for the post. The post passes through without forcing, while the fabric remains close around it. Cutting a hole larger than the post, which can make the installed snap loose.
6 Position the first components Place the cap on the visible side and push its post through the fabric. Fit the matching socket onto the post on the reverse side. The cap is centered over the mark, and the socket faces the direction shown in the kit instructions. Putting the socket on the wrong side or allowing the cap to shift off the mark.
7 Align the setting tool Set the components on a firm, level surface. Center the setting tool over the post and keep it straight above the snap. The tool contacts the center of the snap evenly and is not tilted. Striking at an angle, which can bend the post or leave the cap uneven.
8 Set and test the snap Use the method specified for the kit, applying controlled pressure or light, even taps as appropriate. Repeat with the matching stud and post on the opposite fabric section. The pieces are secure, sit flat, and fasten and release with a firm, even feel. Using excessive force or testing before both halves are aligned and fully set.

Set the Snap Pieces with the Kit’s Tool

How to Use a Snap Button Kit

Set the Snap Pieces with the Kit’s Tool

Lay the fabric on a firm, flat surface before setting the snap. Check the kit instructions, since tools and snap designs can differ. Most kits use separate pieces for the cap, socket, stud, and post. Keep each pair together; similar pieces can be easy to mix up.

Place the fabric between the matching tool parts, with the snap cap facing the right side of the material. Center the post over the marked spot, then check that the layers sit straight. A small shift can leave the snap tilted. Keep it steady. Tap the setting tool with a hammer using controlled, even strikes. Start lightly, then inspect the connection. If the pieces still move, add another measured tap rather than hitting harder at once. Too much force may flatten the post or mark delicate fabric.

Test the snap by opening and closing it a few times. It should hold without pulling the fabric into a wrinkle. Not quite right? Stop and check whether the parts are matched and fully seated. I sometimes find that a second look at the tool alignment matters more than another strike; it is easy to rush this step. For thin material, a fabric scrap can help you check the setting before working on the finished piece.

Test the Closure and Check the Attachment

After installing the snap, test it before trimming loose threads or washing the fabric. Place the material flat on a table and close the fastener with steady pressure. It should click into place without needing a hard squeeze. A crisp sound helps, but feel matters more.

Open and close the snap several times. Watch whether the fabric shifts, puckers, or pulls around the fastener. Then give the closed snap a gentle tug from both sides. Do not yank it; excessive force can damage thin cloth or distort the setting. Check the reverse side, too. The washer should sit evenly, with no prongs sticking out or sharp edges catching your fingertip. Small details count.

If the snap releases too easily, feels crooked, or leaves a widening hole, stop and inspect the setting. The pieces may not be aligned, or the fabric may be too delicate for that snap size. Resetting it can be frustrating, and sometimes the first placement is simply wrong. Still, forcing a loose snap rarely fixes it. Test the closure again after any adjustment, and check that the fabric remains secure when you pull gently. A quick test cannot predict every wear condition, but it can reveal obvious problems before the item is used.

Enquire Today

"*" indicates required fields